Categories
#100DaysofHomeLab keepalived lxd Ubuntu zfs

High availability and backup of my self-hosted lxd services

People who know me know I am a huge fan of virtualization using Cannonical’s lxd. I have been using lxd to create self-hosted web-facing lxc containers since 2016 (when lxd was running as version 2), with high (albeit imperfect) uptime. Over this period, I have added additional computing resources to my home network to improve uptime, user-experience, improved availability and overall performance (I’m a geek, and I like home network play as a hobby). One of the most important asset classes has been Nextcloud, my single most important self-hosted instance that helps me retain at least some of my digital privacy and to also comply with regulations that apply to digital information stored and used as part of my chosen career. I operate two instances of Nextcloud – one for work, one for personal. It’s been a journey learning how to configure them and keep them performing as optimally as I can get them.

I thought it might be good to document some of the methods I use to configure and maintain high availability of my self-hosted services, including Nextcloud. In the hopes that others might learn from this and maybe adopt/adapt to their own needs. I muddy the lines a bit between ‘backup’ and ‘high-availability’ because the technique I use for one, I also sort-of use for the other (that will become clearer below I hope). I backup not just my two Nextcloud instances using the method below, but also this web site and several other services I rely upon (about 11 critical containers as of today, growing slowly but steadily).

Using my high-availability/backup method actually makes it really hard for me to not be online with my services (barring electrical and ISP outages – like many, I don’t have much protection there). I don’t guarantee to never have problems, but I think I can say I am guaranteed to back online with like 99-100%+ of my services even if my live server goes down.

Firstly, for the majority of my self-hosted services, I run them mostly under lxd. Specifically as lxd containers. These are very fast and, well, completely self-contained. I tend to use the container for everything – including the storage requirements the container needs. My Nextcloud containers are just shy of 400GB in size today (large, unwieldy or so you would think), but most of them are just a few GB in size (such as this web site). If I can’t containerize a service, I use a virtual-machine (vm) instead of a container. Seldom though do I use lxd vm’s, I typically use virt-manager for that as I think it’s better suited. My Nextcloud instances run in lxd containers. When I first started using Nextcloud, I had one (small) Nextcloud container running on just one server. If it went down, as it did from time to time (almost always “operator error” driven), I had downtime. That started to become a problem, especially as I started sharing project files with customers so they needed links to just WORK.

So, even several years ago, I started looking at how to get good backups and high availability. The two seemed to be completely different, but now my solution to both is the same. Back then, there was no “copy –refresh” option (see later), so I was left trying to sync ever-growing containers to different machines as I built up my physical inventory. I repurposed old laptops to run as servers to give myself some redundancy. They worked. Well they half worked, but even then I still had blackouts that were not because of ISP or power-utility issues – they were my server(s) not working as I intended them to. My system has evolved substantially over the years, and I am now feeling brave enough to brag on it a little.

For my home network, I run three independent hot servers “all the time” (these are real machines, not VM’s). I have two proper servers running EPYC processors on Supermicro motherboards with way too much resources (#overkill), and I also have a server that’s based on consumer components – it’s really fast, not that the others are slow. Each server runs Ubuntu as the Operating System. Yes that’s right, I don’t use proxmox or other hypervisor to run my vm’s – everything is run via virtualizion on Ubuntu. Two of my live physical servers run Ubuntu 20.04, one runs 22.04 (I upgrade very slowly). In fact, I also run another local server that has a couple of Xeon processors, but I just use that for experiments (often wiping and re-installing various OS’s when a vm just won’t do for me). Finally, but importantly, I have an old System76 Laptop running an Intel i7 CPU and 20GB ram – I use this as a very (VERY) remote backup server – completely different network, power supply, zip code and host-country! I won’t go into any more details on that, but it’s an extension of what I do locally (and lxc copy –refresh is KEY there too – see later). LOL. Here’s some details of my current home servers for the curious:

Server NameCPURAM
Obi-wan KenobeDual EPYC 7H12’s512 GB ECC x 3200MHz
Han SoloDual Epyc 7601’s256GB ECC x 2600 MHz
SkywalkerRyzen 3900X128GB ECC x 3200 MHz
Darth VaderIntel i7-7500U20GB non-ECC x 2133MHz
DookuDual Xeon 4560’s24GB ECC x 1600 MHz
Note – you wouldn’t guess, but I am a bit of a Star Wars fan 🙂

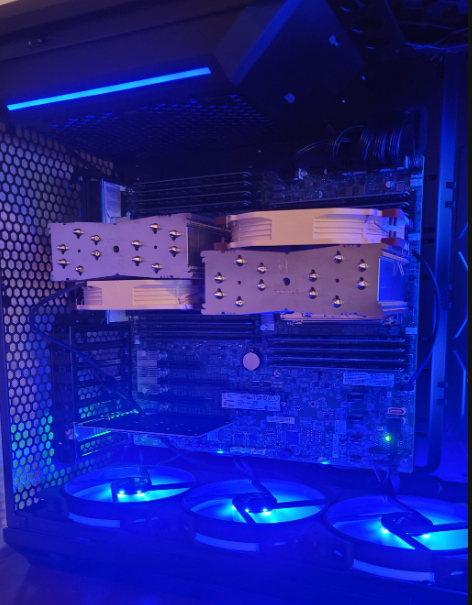
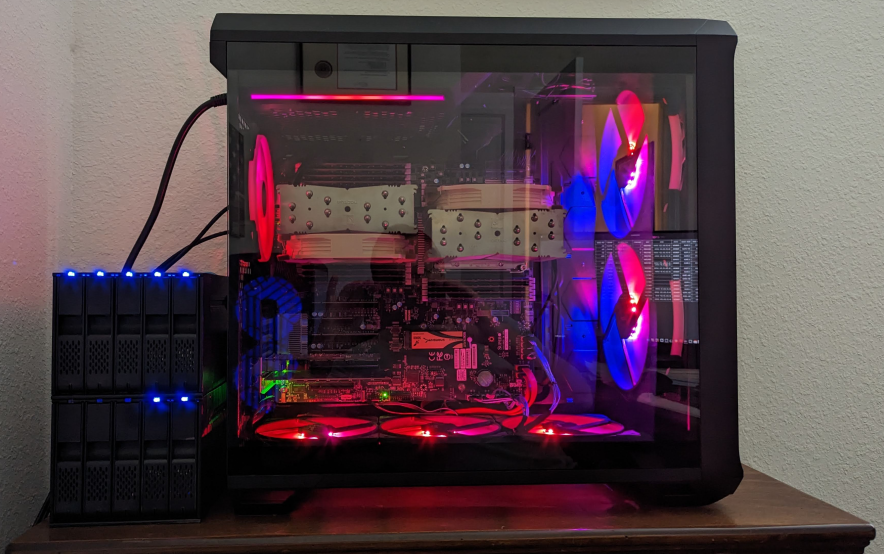
The above servers are listed in order of importance to me. Obi-Wan Kenobe (or ‘obiwan’ per the actual /etc/hostname) is my high-end system. AMD EPYC 7H12’s are top of the line 64-core EPYC ROME CPU’s. I got mine used. And even then, they weren’t terribly cheap. Complete overkill for self-hosting but very cool to play with. Here’s my main ‘obiwan’ Epyc server:
Each of the servers Obiwan, Solo and Skywalker run lxd 5.0 under the Ubuntu OS (i.e the latest stable LTS version of lxd, not just the latest version), and each of them are using NVMe storage for the primary lxd default zpool for the containers:

zpool status lxdpool
pool: lxdpool
state: ONLINE
scan: scrub repaired 0B in 00:16:54 with 0 errors on Sat Mar 11 19:40:55 2023
config:

NAME             STATE     READ WRITE CKSUM
lxdpool          ONLINE       0     0     0
  nvme2n1_crypt  ONLINE       0     0     0
  nvme3n1_crypt  ONLINE       0     0     0

errors: No known data errors

Each of these lxd zfs storage pools is based on 2TB NVMe drives or multiples thereof. The lxd instance itself is initialized as a separate, non-clustered instance on each of the servers, each using a zfs zpool called ‘lxdpool’ as my default backing storage and each configured with a network that has the same configuration in each server. I use 10.25.231.1/24 is the network for the lxdbr0. This means I run three networks with the same IP as subnets under my lab.:

This is very deliberate on my part as it allows me to replicate containers from one instance to another – and to have each server run the same container with the same ip. Since these are self-contained subnets, there’s no clashing of addresses, but it makes it easy to track and manage how to connect to a container, no matter what server it is on. I host several services on each server, here’s some of them, as they are running on each server now:

So to be clear, most (not all) of the containers have the exact same IP address on each server. Those are the ones I run as part of my three-server fail-over high availability service.

My haproxy container is the most unique one as each of them is in fact configured with three IP addresses (only one is shown above):

This is because my haproxy is my gateway for each lxd vm/container on each of the servers. If a web service is called for, it all goes via haproxy on the physical server. Note that two of the IP’s are from the same are from DHCP on my home LAN (10.231.25.1/24), whereas my servers each have their lxd networks configured using lxd DHCP from 10.25.231.1/24 (I chose to keep a similar numbering system for my networks as it’s just easier for me to remember). Importantly, my home router sends all port 80/443 traffic from www to whatever is sitting at IP 10.231.25.252. So that address is the HOT server, and it turns out, it’s very easy to switch that from one live server that goes down, immediately to a stand-by. This is keep to my high availability.

The 10.231.25.131 is unique to the Obiwan haproxy container, whereas 10.231.25.252 is unique to the HOT instance of haproxy via keepalived. On each of the other two hot servers, they are also running keepalived and they have a 10.231.25.x IP address. They ONLY inherit the second, key ip address of 10.231.25.252 if Obiwan: goes down – that’s the beauty of keepalived. It works transparently to me to keep a hot instance of 10.231.25.252 – and it changes blindingly fast if the current hot instance goes down (it’s a bit slower to change back ~5-10 seconds, but I only need one fast way so that’s cool).

So, if Obiwan goes down, one of my other two servers pick up the 10.231.25.252 IP *instantly* and they become the recipient of web traffic on ports 80 and 443. (Solo is second highest priority server after Obwan, and Skywalker is my third and final local failover). And since each server is running a very well synchronized copy of the containers running on Obiwan, there’s no disruption to services – virtually, and many times actually, 100% of the services are immediately available if a fail-over service is being deployed live. This is the basis for my lan high-availability self-hosted services. I can (and sometimes have to) reboot servers and/or they suffer outages. When that happens, my two stand-by servers kick in – Solo first, and if that goes down, Skywalker. As long as they have power. Three servers might be overkill for some, but I like redundancy more than I like outages – three works for me. Two doesn’t always work (I have sometimes had two servers dead a the same time – often self-inflicted!). Since I have been operating this way, I have only EVER lost services during a power cut or when my ISP actually goes down (I do not attempt to have redundancy from these). I’d say that’s not bad!

Here is a short video demonstrating how my high-availability works

So how do I backup my live containers and make sure the other servers can take over if needed?

  1. Firstly, even though I don’t use lxd clustering, I do connect each of the other two independent lxd servers to Obiwan, via the ‘lxd remote add’ feature. Very very cool:

2. Each lxd server is assigned the same network address for the default lxdbr0 (this is important, as using a different numbering system can sometimes mess with lxd when trying to ‘copy –refresh’).

3. Each server also has a default zfs storage zpool called ‘lxdpool’ (this is also important). And I use the same backging storage as sometimes I have foound even that to behave oddly with copy –refresh actions.

4. Every X minutes (X is usually set to 30, but that’s at my choosing via cron) I execute essentially the following script at each of Solo and separately at Skywalker servers (this is the short version, I actually get the script to do a few more things that are not important here):

cnames="nextcloud webserver-name etc."
For i = name in $cnames do
/snap/bin/lxc stop $name
/snap/bin/lxc copy obiwan:$name $name --refresh
/snap/bin/lxc start $name
done

Remarkably, what this simple ‘lxc copy –refresh’ does is to copy the actual live instance of my obiwan server containers to solo and skywalker. Firstly it stops the running container on the backup server (not the live, hot version), then it updates the backup version, then it restarts it. The ‘updating it’ is a key part of the process and lxc ‘copy –refresh’ makes it awesome. You see, when you copy a lxd instance from one machine to another, it can be a bit quirky. A straight ‘lxc copy’ (without the –refresh option) action changes IP and mac address on the new copy, and these can make it difficult to keep track of in the new host system – not good for fail-over. When you use –refresh as an option, it does several important things. FIRSTLY, it only copies over changes that have been made since the last ‘copy –refresh’ – so a 300GB container doesn’t get copied from scratch every time – maybe a few MB or few GB – not much at any time (the first copy takes the longest of course). This is a HUGE benefit, especially when copying over WAN (which I do, but won’t detail here). It’s very fast! Secondly, the IP address and even the MAC address are unchanged in the copy over the original. It is, in every way possible, IDENTICAL copy to the original. That is, to say the least, very handy, when you are trying to create a fail-over service! I totally love ‘copy –refresh’ on lxd.

So a quick copy –refresh every 30 minutes and I have truly hot stand-by servers sitting, waiting for “keepalived” to change their IP so they go live on network vs being in the shadow as a hot backup. Frankly I think this is wonderful. I could go for more frequent copies but for me, 30 minutes is reasonable.

In the event that my primary server (Obiwan) goes down, the haproxy keepalived IP address is switched immediately (<1 second) to Solo and, if necessary finally Skywalker (i.e. I have two failover servers), and each of them is running an “exact copy” of every container I want hot-backed up from Obiwan. In practice, each instance is a maximum 15-30 minutes “old” as that’s how often I copy –refresh. They go live *instantly* when Obiwan goes down and can thus provide me with a very reliable self-hosted service. My containers are completely updated – links, downloads, files, absolutely EVERYTHING down to even the MAC address is identical (max 30 minutes old).

Is this perfect? No.

What I DON’T like about this is that the server can still be up to 30 minutes old – that’s still a window of inconvenience from time to time (e.g. as and when a server goes down and I am not home – it happens). Also, I have to pay attention if a BACKUP server container is actually changed during the primary server downtime – I have to figure out what’s changed so I can sync it to the primary instances on Obiwan when I fix the issues, because right now I only sync one-way (that’s a project for another day). But for me, I manage that risk quite well (I usually know when Obiwan is going down, and I get notifications anyhow, so I can stop ‘making changes’ for a few minutes while Obiwan e.g. reboots). My customers don’t make changes – they just download files, so no issues on back-syncing there.

What I DO like about this is that I can literally lose any two servers and I still have a functioning homelab with customer-visible services. Not bad!

In the earlier days, I have tried playing with lxd clustering, and ceph on my lxd servers to try more slick backup solutions that could be even more in sync in each direction. Nice in theory, but for me, it always gets so complicated that one way or another (probably mostly because of me!), it breaks. THIS SYSTEM I have come up with works because each server is 100% independent. I can pick one up and throw it in the trash and the others have EVERYTHING I need to keep my services going. Not shabby for a homelab.

Technically, I actually do EVEN MORE than this – I also create completely separate copies of my containers that are archived on a daily and weekly basis, but I will save that for another article (hint: zfs deduplication is my hero for that service!).

I love lxd, and I am comfortable running separate servers vs clustering, ceph and other “cool tec” that’s just too hard for me. I can handle “copy –refresh” easily enough.

I hope you find this interesting. 🙂

One question: how do you roll your backups? Let me know on twitter (@OGSelfHosting) or on mastadon (@[email protected]).

Andrew
Categories
#100DaysofHomeLab 2FA Jus' Blogging ssh Ubuntu Uncategorized

Make SSH better with ‘convenient’ 2FA

TLDR; SSH with public-private key is quite secure, but it relies on you keeping your private key secure – a single point of failure. OpenSSH allows the additional use of one-time passwords (OTP) such as those generated via google authenticator app. This 2FA option provides for “better” security which I personally think is a good practice for ssh via wide area network access (i.e. over the intenet), but truth be told it’s not always convenient because, out-of-the-box and with most online instructions, you also have to use it when on your local area network which should be much more secure than accessing devices via the internet. Herein I describe how to setup 2FA (most important) and also how to bypass 2FA when using ssh on home lan-to-lan connections, but to always require it from anywhere outside the lan. This means your daily maintenance on-site can provide easy access to servers (using just your ssh key) whilst still protecting them with 2FA from any internet access.

My instructions below work on a July 2022 fresh install of Ubuntu 20.04 server, with OpenSSH installed (‘sudo apt update && sudo apt install openssh-server’ on your server if you need to do this). I further assume right now that you have password access to this server, which is insecure but we will fix that. I also assume the server is being accessed from a July 2022 fresh install of Ubuntu Desktop (I chose this to try to make it easier – I can’t cover all distros/setups of course).

The instructions for by-passing lan are right at the end of this article, because I spend a lot of time trying to explain how to install google-authenticator on your phone/server (which takes most of the effort). If you already have that enabled, just jump to the END of this article and you will find the very simple steps needed to bypass 2FA for lan access. For anyone else who does NOT use 2FA for ssh, I encourage you to read and try the whole tutorial.

WARNING – these instructions work for me, but your mileage may vary. Please take precautions to make backups and practice this on virtual instances to avoid being locked out of your server! With that said, let’s play:

INSTRUCTIONS

Firstly, these instructions require the use of a time-based token generator, such as google’s authenticator app. Please download and install this on your phone (apple store and play store both carry this and alternative versions). We will need this app later to scan a barcode which ultimately generates one time passwords. The playstore app is located here. Apple’s is here, Or just search the app stores for ‘google authenticator’ and match it with this:

Install it, that’s all you need to do for now.

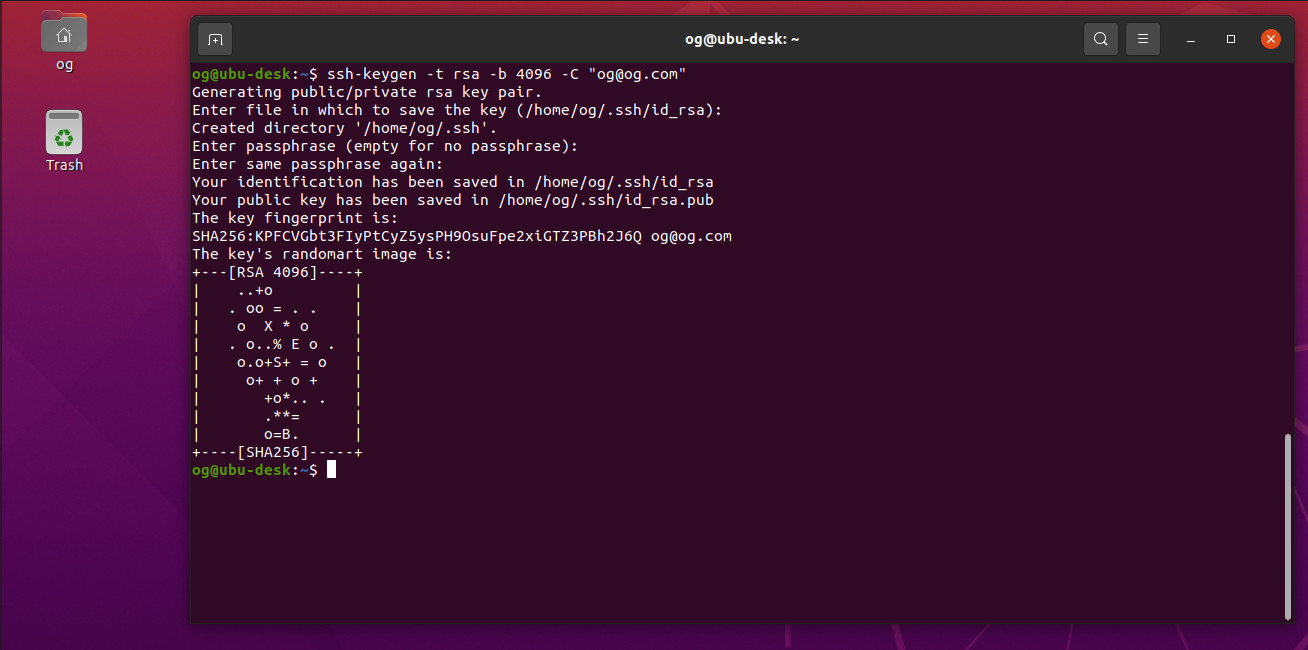
On your desktop, create an ssh key if required, e.g. for the logged-in user (in my case, username ‘og’) with an email address of [email protected]:

ssh-keygen -t rsa -b 4096 -C "[email protected]"

Enter a file name, or accept the default as I did (press ‘Enter’). Enter a passphrase for the key if you wish (for this demo, I am not using a passphrase, so I just hit enter twice). A passphrase more strongly protects your ssh key. You should see output like this:

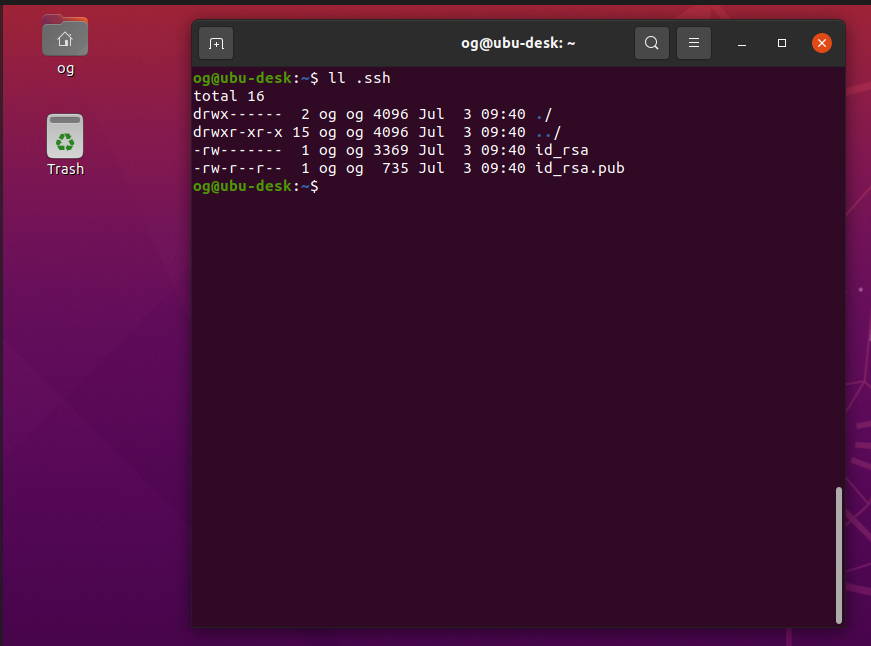
If you now check, you will see a new folder created called .ssh – let’s look inside:

id_ras is the PRIVATE key, id_rsa.pub is the PUBLIC key – we need both

Now let’s copy the ssh key to our server. We assume our server is on ip 10.231.25.145, and your username is og in the commands below. Please change the IP and username for yours accordingly:

ssh-copy-id [email protected]

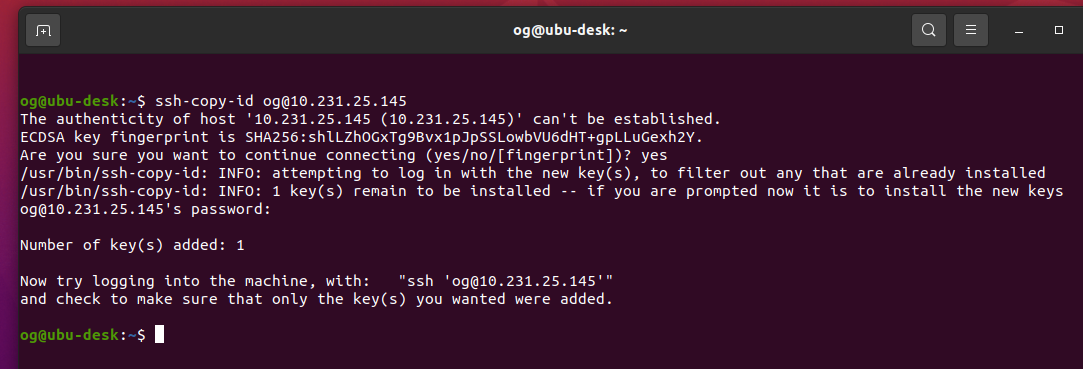
In my case, this was the first time I accessed this server via ssh, so I also saw a fingerprint challenge, so I was first presented with this, which I accepted (type ‘yes’ and ‘Enter’):

The server then prompts you for your username credentials:

Enter your password to access the server then you will see this message:

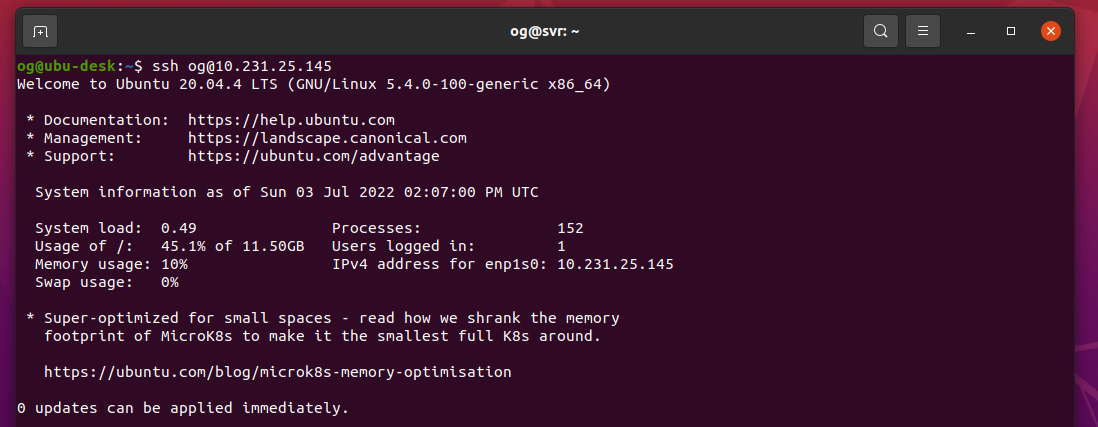
Prove it by logging in as suggested in the screen prompt that you have (in mine, it says ‘try logging into the machine, with ssh [email protected]’ – yours will be different), you should see something like this:

Stage 1 complete – your ssh key is now in the server and you have passwordless and thus much more secure access. Note, if you secured your ssh key with a password, you will be prompted for that every time. There are some options for making that more conveneient too, but that’s right at the very end of this article. Further note: DO NOT delete or change your ssh key as you may otherwise get locked out of ssh access for your server after you make additional changes per below, as I intend to remove password access via ssh to the server:

Log back into your server if required, then edit your ssh config file to make some basic changes needed for key and 2FA access:

sudo nano /etc/ssh/sshd_config

(Here is my complete file, including the changes highlighted in bold red):

#	$OpenBSD: sshd_config,v 1.103 2018/04/09 20:41:22 tj 
# This is the sshd server system-wide configuration file.  See
# sshd_config(5) for more information.
# This sshd was compiled with PATH=/usr/bin:/bin:/usr/sbin:/sbin
# The strategy used for options in the default sshd_config shipped # with
# OpenSSH is to specify options with their default value where
# possible, but leave them commented.  Uncommented options 
# override the
# default value.

Include /etc/ssh/sshd_config.d/*.conf

#Port 22
#AddressFamily any
#ListenAddress 0.0.0.0
#ListenAddress ::
#HostKey /etc/ssh/ssh_host_rsa_key
#HostKey /etc/ssh/ssh_host_ecdsa_key
#HostKey /etc/ssh/ssh_host_ed25519_key
# Ciphers and keying
#RekeyLimit default none

# Logging
#SyslogFacility AUTH
#LogLevel INFO

# Authentication:

#LoginGraceTime 2m
#PermitRootLogin prohibit-password
#StrictModes yes
#MaxAuthTries 6
#MaxSessions 10

PubkeyAuthentication yes

# Expect .ssh/authorized_keys2 to be disregarded by default in future.
#AuthorizedKeysFile	.ssh/authorized_keys .ssh/authorized_keys2

#AuthorizedPrincipalsFile none

#AuthorizedKeysCommand none
#AuthorizedKeysCommandUser nobody

# For this to work you will also need host keys in /etc/ssh/ssh_known_hosts
#HostbasedAuthentication no
# Change to yes if you don't trust ~/.ssh/known_hosts for
# HostbasedAuthentication
#IgnoreUserKnownHosts no
# Don't read the user's ~/.rhosts and ~/.shosts files
#IgnoreRhosts yes

# To disable tunneled clear text passwords, change to no here!
PasswordAuthentication no
#PermitEmptyPasswords no

# Change to yes to enable challenge-response passwords (beware issues with
# some PAM modules and threads)
ChallengeResponseAuthentication yes

# Kerberos options
#KerberosAuthentication no
#KerberosOrLocalPasswd yes
#KerberosTicketCleanup yes
#KerberosGetAFSToken no

# GSSAPI options
#GSSAPIAuthentication no
#GSSAPICleanupCredentials yes
#GSSAPIStrictAcceptorCheck yes
#GSSAPIKeyExchange no

# Set this to 'yes' to enable PAM authentication, account processing,
# and session processing. If this is enabled, PAM authentication will
# be allowed through the ChallengeResponseAuthentication and
# PasswordAuthentication.  Depending on your PAM configuration,
# PAM authentication via ChallengeResponseAuthentication may bypass
# the setting of "PermitRootLogin without-password".
# If you just want the PAM account and session checks to run without
# PAM authentication, then enable this but set PasswordAuthentication
# and ChallengeResponseAuthentication to 'no'.
UsePAM yes

#AllowAgentForwarding yes
#AllowTcpForwarding yes
#GatewayPorts no
X11Forwarding yes
#X11DisplayOffset 10
#X11UseLocalhost yes
#PermitTTY yes
PrintMotd no
#PrintLastLog yes
#TCPKeepAlive yes
#PermitUserEnvironment no
#Compression delayed
#ClientAliveInterval 0
#ClientAliveCountMax 3
#UseDNS no
#PidFile /var/run/sshd.pid
#MaxStartups 10:30:100
#PermitTunnel no
#ChrootDirectory none
#VersionAddendum none

# no default banner path
#Banner none

# Allow client to pass locale environment variables
AcceptEnv LANG LC_*

# override default of no subsystems
Subsystem	sftp	/usr/lib/openssh/sftp-server

# Example of overriding settings on a per-user basis
#Match User anoncvs
#	X11Forwarding no
#	AllowTcpForwarding no
#	PermitTTY no
#	ForceCommand cvs server
AuthenticationMethods publickey,keyboard-interactive

(END OF FILE)

Note there is a LOT MORE you can do to configure and secure ssh, but these changes (when completed - inc. below) will make for a much more secure installation than what you get 'out of the box'.  

Now install the server version of google-authenticator on your server - this is what we 'syncronise' to your phone:

sudo apt install -y libpam-google-authenticator

Now configure authenticator by typing the following command and hitting 'Enter':

google-authenticator

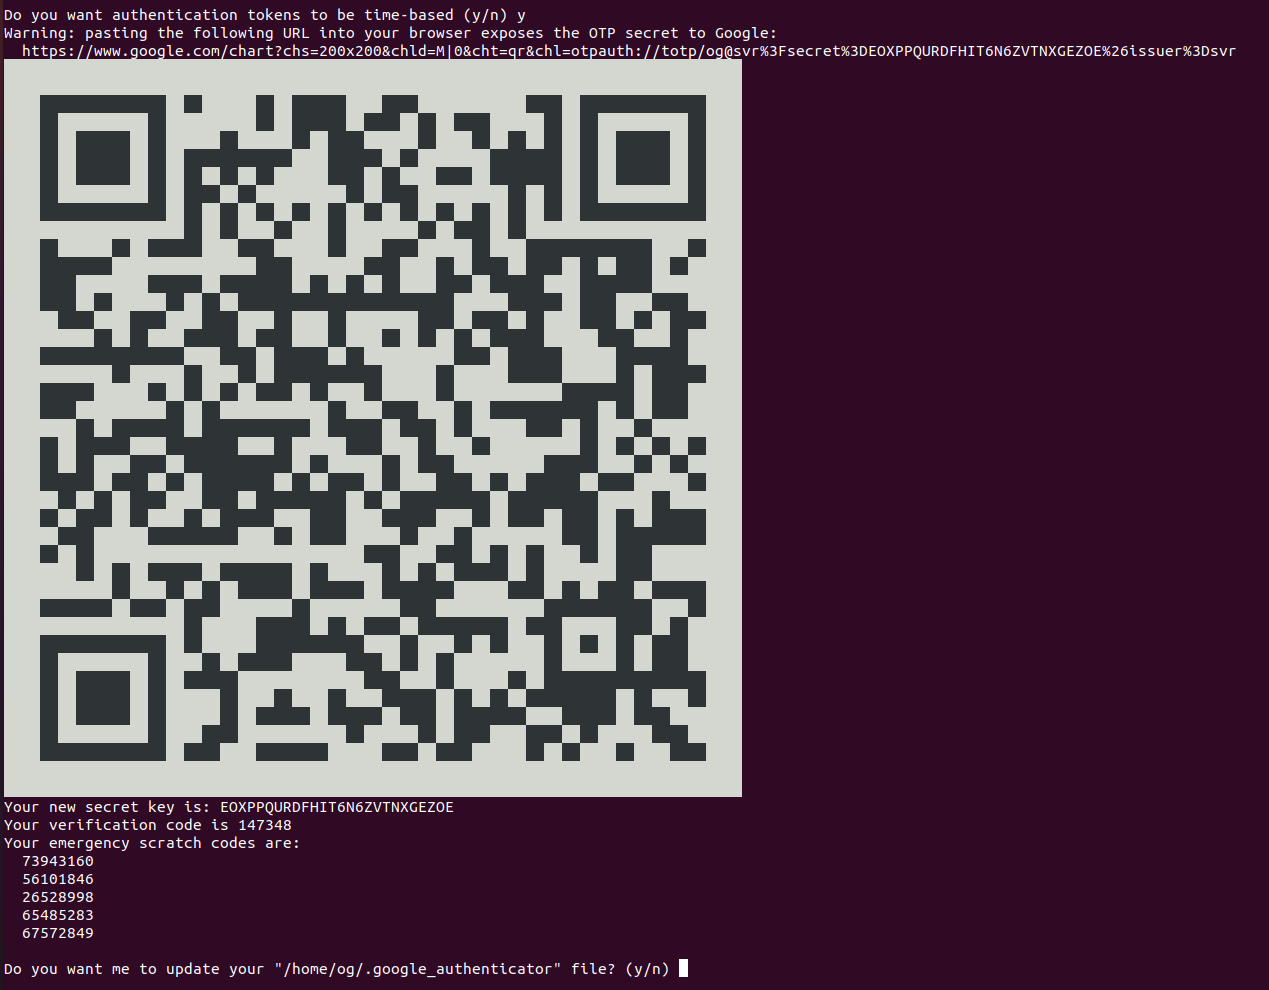
Enter 'y' at the first prompt and you will see somehing like this:

The QR code is your google authenticator 2FA key. Enter this into your phone app by opening the app and scanning the QR code generated on your screen. The authenticator app uses the above QR code (key) to generate seemingly random numbers that change every 30 seconds. This is our 2FA code and using it as part of your ssh login it makes it MUCH HARDER for someone to hack your ssh server.

PRO TIP: Also, take a screenshot of your QR code (i.e. the above) and save it in a very secure place (offline?) so you can re-create your 2FA credential if you ever e.g. lose your phone. It saves you having to reset everything, but keep it VERY SECURE (like your rsa private key).

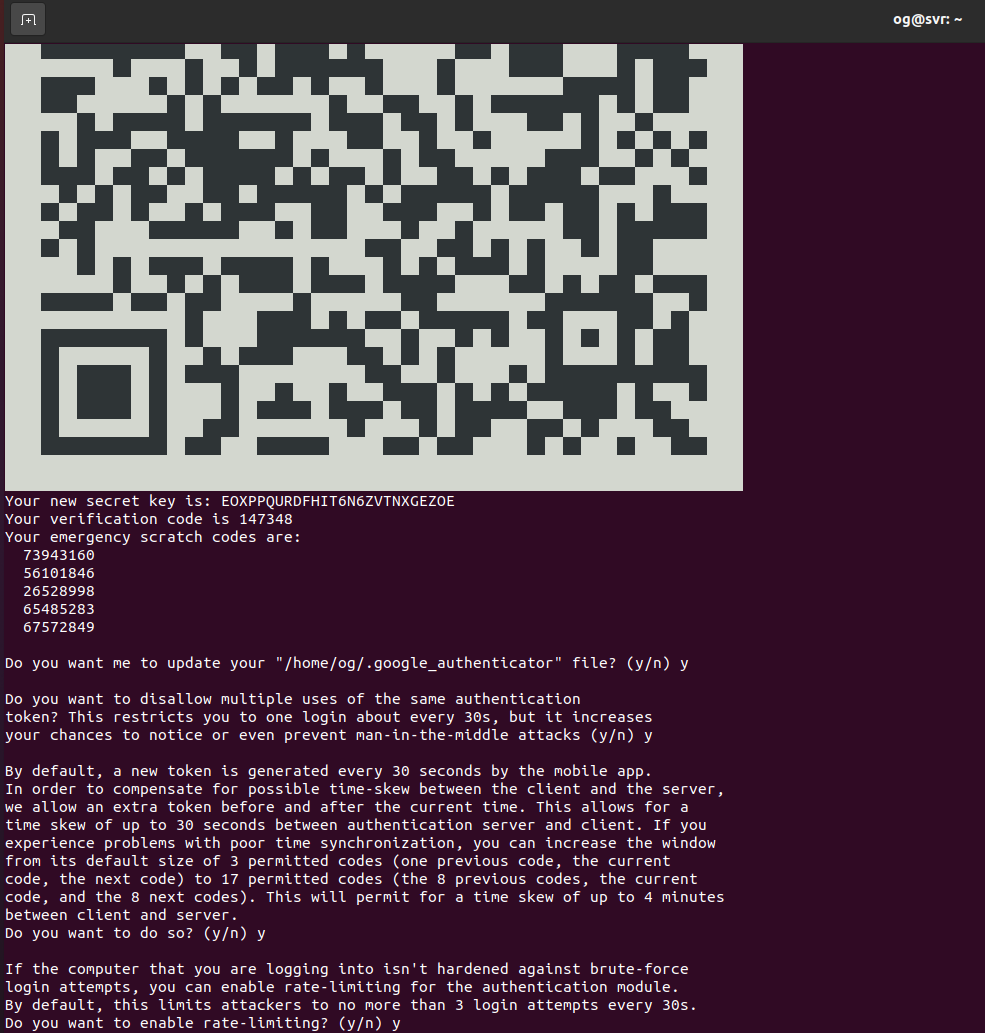
Accept ‘y’ to update the google authenticator file. I accepted all the default prompts too, and that’s a pretty good setup so I recommend you do the same. Once you are done, you should see something like this:

Now edit the following file on your server:

sudo nano /etc/pam.d/sshd

Comment out the ‘@include common-auth’ statement at the top of the file by making it look like this:

# @include common-auth

(This disables the use of password authentication, which is very insecure, especially if you have a weak password). Then add these 2 lines to the end of the file:
auth required pam_google_authenticator.so
auth required pam_permit.so

Save the file. Now restart the ssh server using:

sudo systemctl restart ssh

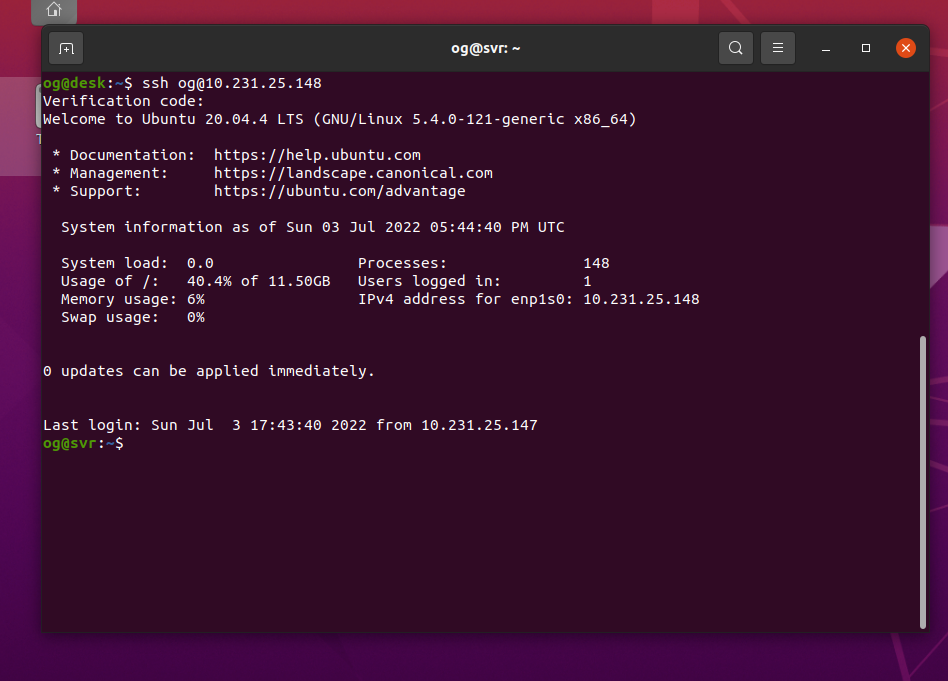
Now open a NEW terminal window on our desktop (do not close the original window – we need that to fix any mistakes, e.g. a typo). Ssh back into your server using this second terminal window. If all has gone well, you will be prompted to enter the google-authenticator code from the app on your phone:

Enter the 2FA code from your smartphone google-authenticator app and hit enter, this should get you back at the terminal of your server, logged in SECURELY and using an SSH-key AND 2FA credentials. If all has further gone well, you will be greeted with your login screen – something like:

CONGRATULATIONS! You have now enabled 2FA on your server, making it much more secure against hackers. Your server is now much safer than the out-of-the-box method that uses a password only to secure a server. NOTE if you are unable to login, use the original terminal to edit your files and fix typo’s etc. DO NOT close the original terminal window until you have 2FA working, else you will lock yourself out of your server and will have to use a mouse, keyboard and monitor to regain access.

But we are not done yet – if you recall, I said we want to make this convenient, and this is the really EASY part. Log back into your server (if required) then re-open the /etc/pam.d/sshd file:

sudo nano /etc/pam.d/sshd

Add the following line above the prior two entries you made earlier (note that in my version below, the string wraps to two lines but it should all be on a single line):

auth [success=1 default=ignore] pam_access.so accessfile=/etc/security/access-local.conf

So to be clear, the end of your file (i.e. the last three lines of /etc/pam.d/sshd) should look like this:

Save the file. Now create and edit the following file. This is where we will make this configuration work differently for lan vs wan access:

sudo nano /etc/security/access-local.conf

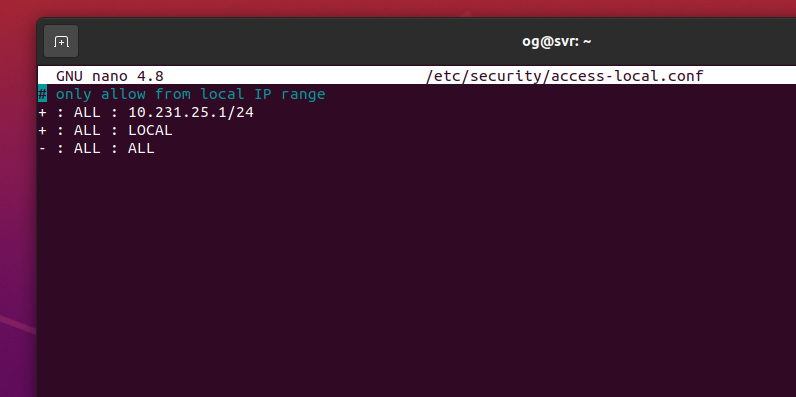
Enter something like this, but change the 10.231.25.1/24 IP range to your lan. For example, if your lan is 192.168.1 to 192.168.1.255, enter 192.168.1/24. Mine is 10.231.25.1/24, so I use the following

+:ALL : 10.231.25.1/24
+:ALL: LOCAL
+:ALL:ALL

I know that looks a little…strange, but it will bypass 2FA requirements when the originating IP is as shown in line 1. My file looks like this:

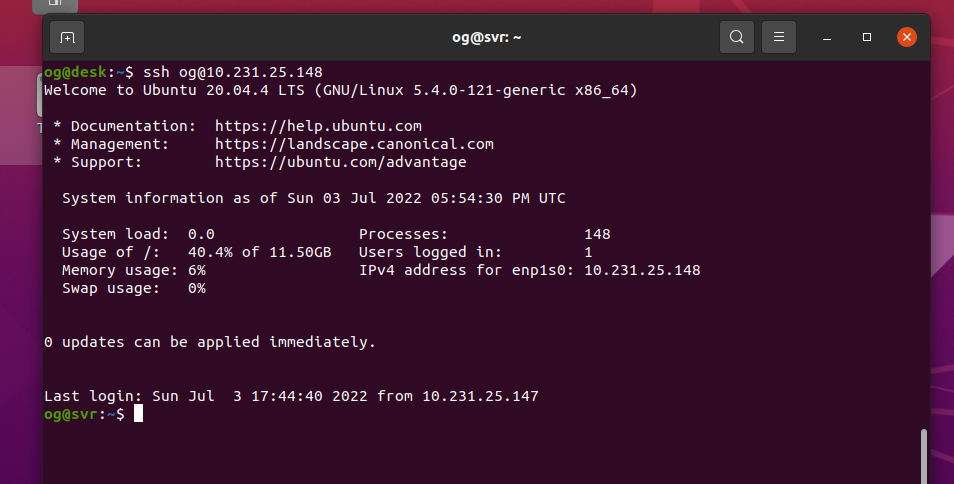
Save the file, quit your server then re-login to your server (no need to restart even the ssh-server – this works straight away). You are immediately greeted with your login screen – no 2FA credential is required:

So you are no longer asked for any 2FA key, but only because you logged in from your lan. That’s because the server knows you are accessing ssh from your lan (i.e. in my case, an address in the range 10.231.25/1 to 10.231.25.255 in the above example), so it will bypass the need for 2FA. If you try to login via any other ip range – say a wifi hotspot in a hotel, or indeed ANY different network you will need to enter your 2FA credentials in addition to having the ssh key of course (which you need for lan access too – i.e. the .ssh/id_rsa keyfile).

BONUS TIP – remember I touched on the use of passwords for rsa keys. They too are useful but can be “inconveneient” to re-type every time. There are password caching mechanisms for logins (google is your friend), but you can also make this “even more secure” and yet still very convenient for lan acccess by adding a password to the copy of your private rsa key that you use to access the server remotely, but dispense with that for the ssh key you use to access it locally.

I hope this tutorial helped. Comments very welcome and I will try to answer any questions too! I can be reached on @OGSelfHosting on Twitter.

Categories
#100DaysofHomeLab Jus' Blogging keepalived lxd Ubuntu Uncategorized

Nextcloud Fail-over

I have operated a Nextcloud instance for several years. It has completely replaced DropBox, OneDrive and even Google Drive for me. However, my single-instances of Nextcloud have occasionally had downtime (power cuts, server issues and especially ‘administrator configuration fubars’). I have experimented with a Nextcloud failover service to try to improve mmy uptime, and it’s now in ‘experimental operation’.

At the present time, I now have TWO instances running on two different hardware platforms. Both instances run in a virtual environment. One, running on my new dual-EPYC server, is the primary instance intended to be in operation ‘all of the time’. The other, on a purpose-built server based on consumer hardware, is a mirror of the primary instance but theoretically is always hot and able to come online at a moments notice. If my primary server goes down, the backup takes over in about 1-3 seconds.

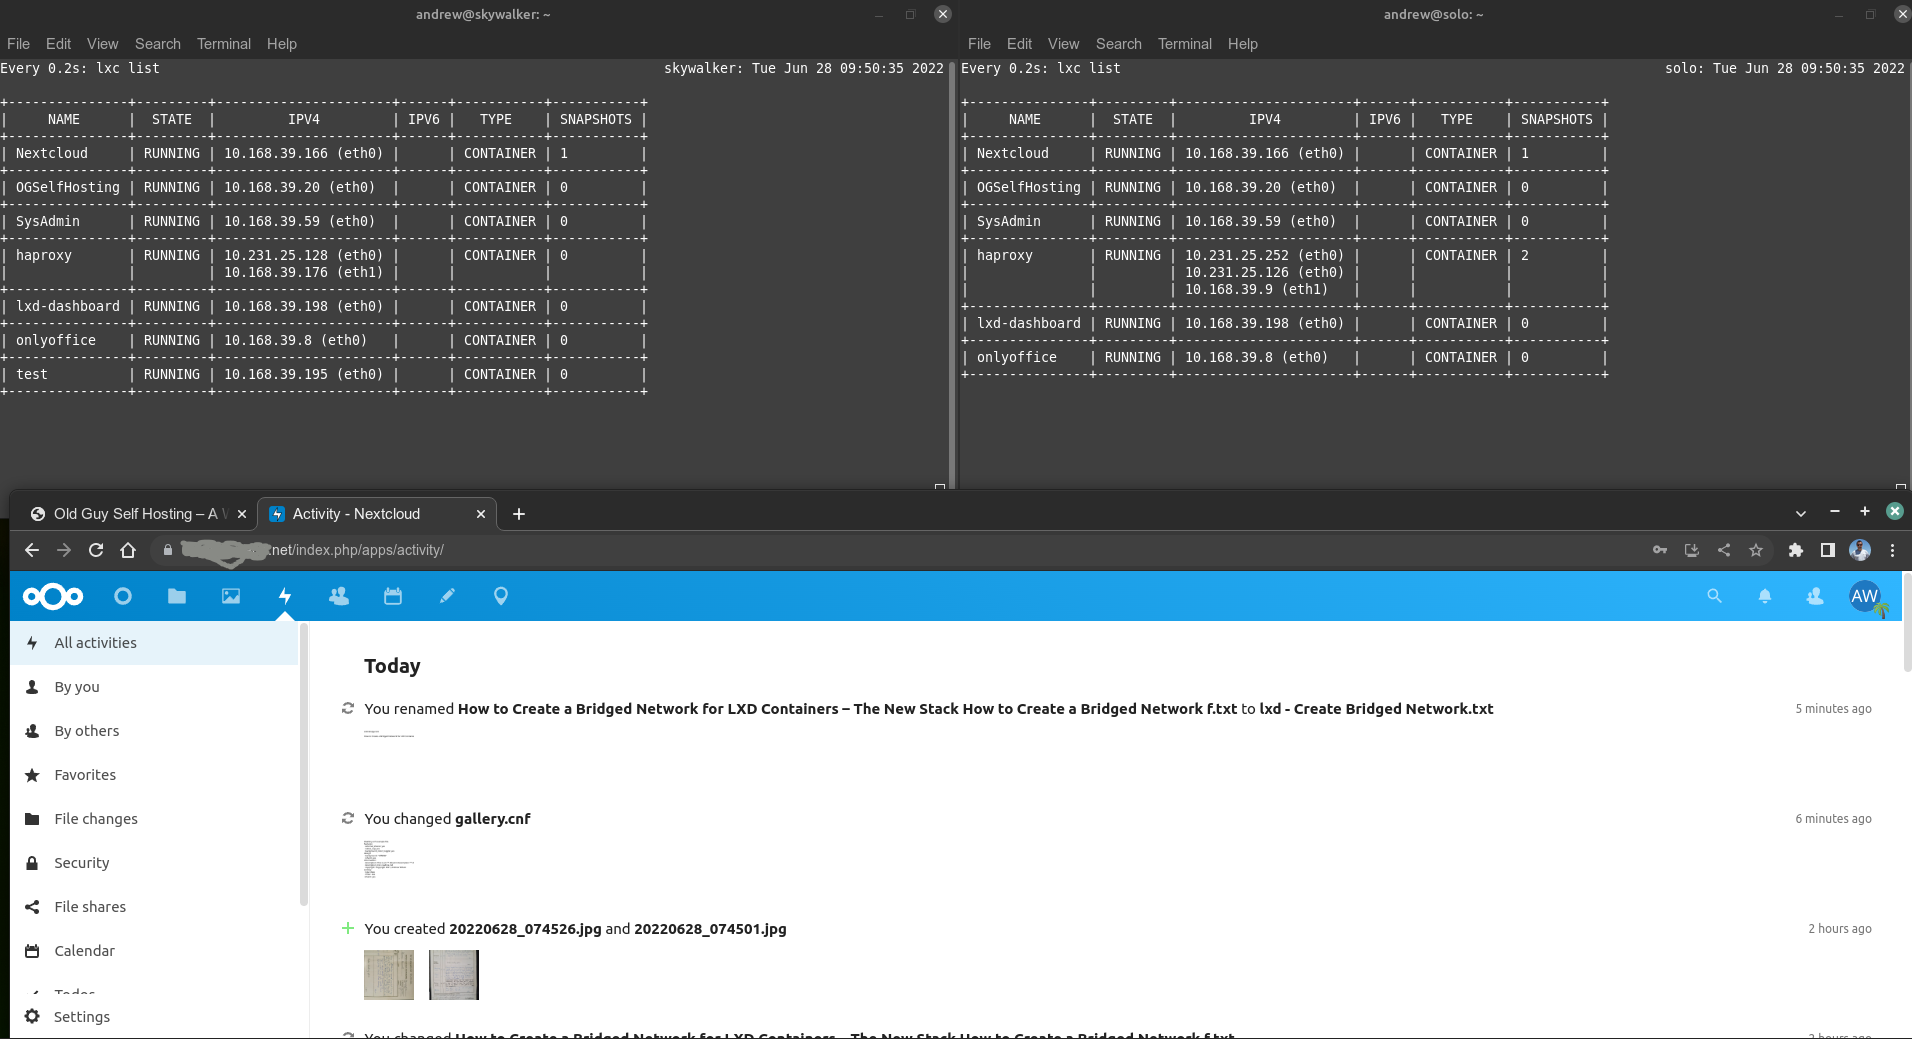
Primary Nextcloud container running on server1 (top right), backup on server2 (top left)

I rely upon two key software packages to help me make this happen: (1) lxd, which I use to run all my containers and even some of my vm’s (I suspect Docker would work equally well); and (2) keepalived, which provides me with a ‘fake’ IP I can assign to different servers depending on whether they are operational or not.

I am going to run this service with just two instances (i.e. one fail-over server). For now, both services are hosted in the same physical property and use the same power supply – so I do not have professional-grade redundancy (yet). I may add a third instance to this setup and even try to place that in a different physical location which would considerably improve robustness against power loss, internet outages etc. But that’s for the future – today I just finally have some limited albeit production-grade fail-over capability. I shall see if this actually makes my reliably better (as intended), or if the additional complexity just brings new problems that make things worse or at least no-better.

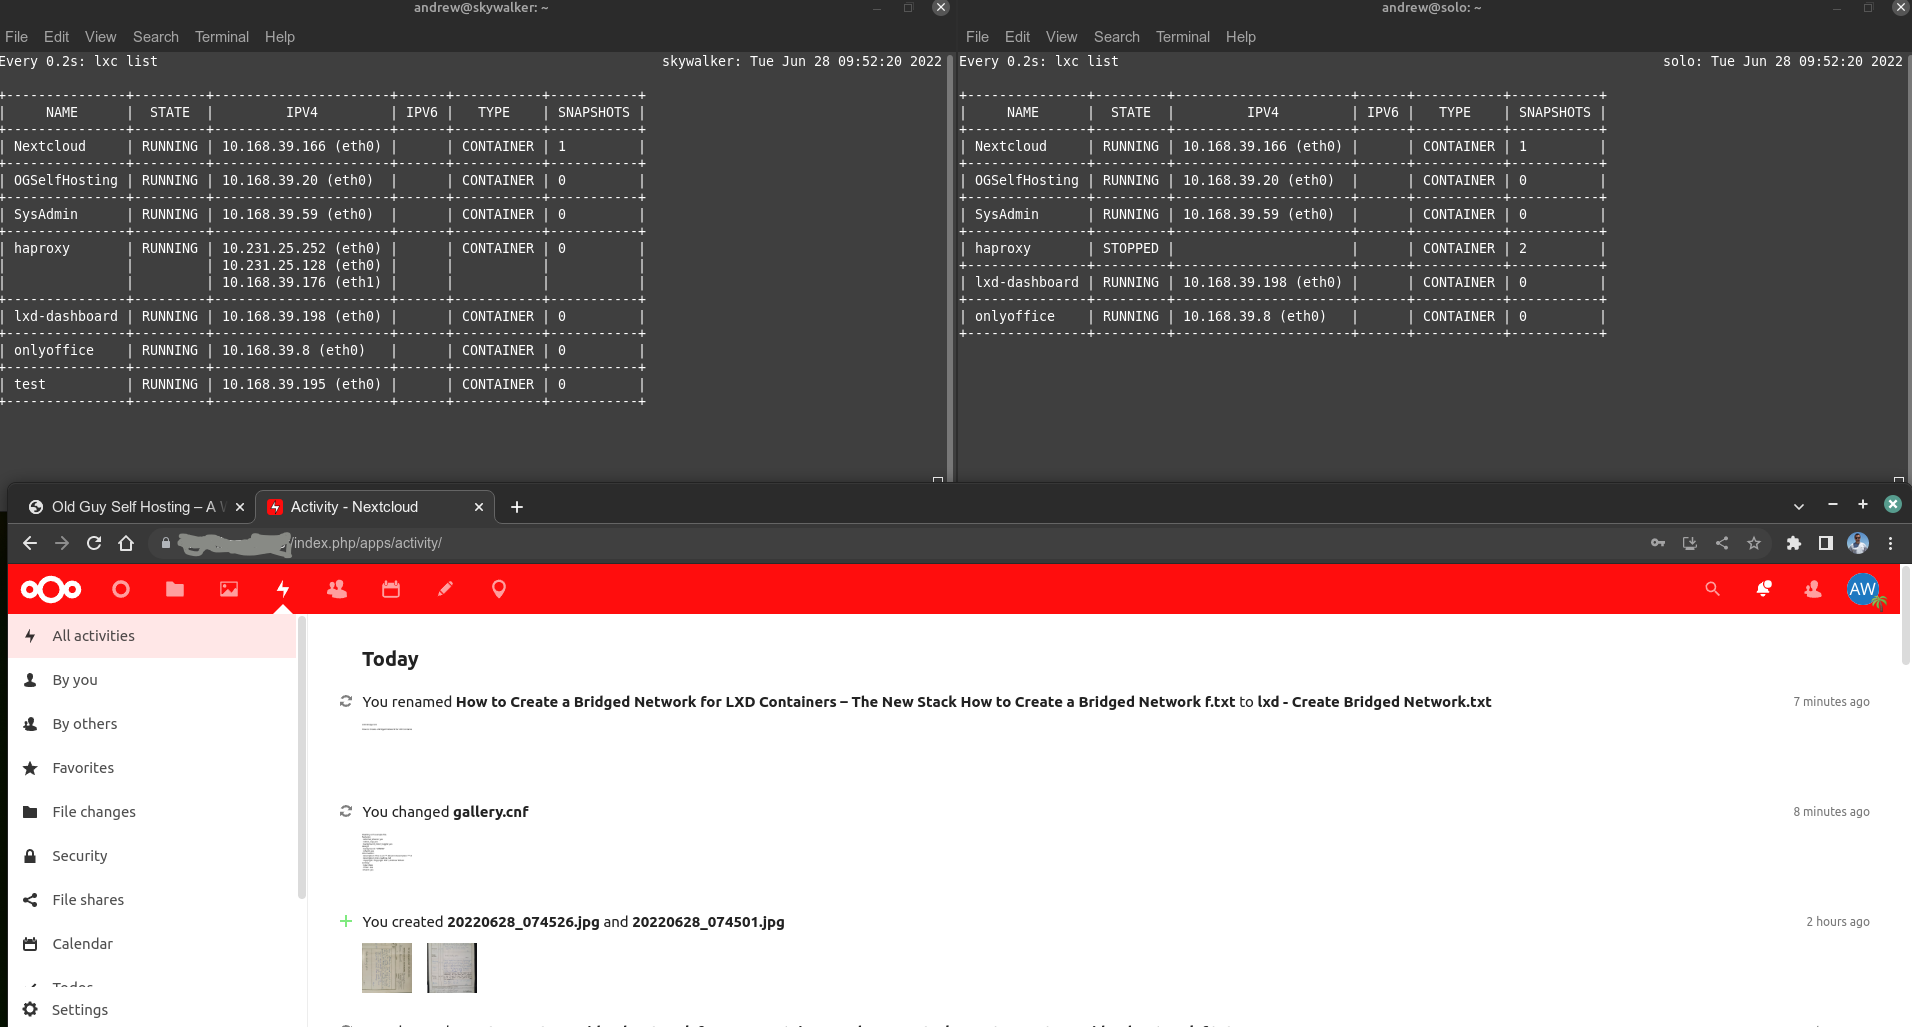
Server2 has kicked-in when I shutdown server 1.

A couple of additional details – I actually hot-backup both my Nextcloud server and a wordpress site I operate. As you can also see from the above image, I also deliberately change the COLOR of my Nextcloud banners (from blue to an unsubtle RED) just to help me realize something is up if my EPYC server goes down since I don’t always pay attention to phone notifications. I only perform a one-way sync, so any changes made to a backup instance will not be automatically regenerated on the primary server as/when it comes back online after a failure. This is deliberate, to reduce making the setup too complicated (which could otherwise not go unpunished!). A pretty useful feature: my ENTIRE Nextcloud instance is hot-copied – links, apps, files, shares, sql daabase, ssl certs, user-settings, 2FA credentials etc. Other than the color of the banner ( and a pop-up notification), the instances are ‘almost identical’*. Lxd provides me with this level of redundancy as it copies everything when you use the refresh mode. Many other backup/fail-over implemetations I have explored in the past do not provide the same level of easy redundency for a turn-key service.

(*) Technically, the two instances can never be truly 100.0000000…% identical no matter how fast you mirror an instance. In my case, there is a user-configurable difference between the primary server and the backup server at the time of the fail-over coming online. I say user-cobfigurable because this is the time delay for copying the differences between server1 and server2. I configure this via the scheduling of the ‘lxc copy –refresh’ action. On a fast network, this can be as little as a minte or two, or potentially even faster. For my use-case, I accept the risk of losing a few minutes worth of changes, which is my maximum risk for the benefit of having a fail-over service. Accordingly, I run my sync script “less frequently” and as of now, it’s a variable I am playing with vs running a copy –refresh script constantly.

If anyone has any interest in more details on how I configure my fail-over service, I’ll be happy to provide details. Twitter: @OGSelfHosting

Categories
#100DaysofHomeLab Jus' Blogging luks Ubuntu zfs

ZFS on LUKS

How to luks-encrypt and auto-unlock a drive used for zfs storage

I have seen some onlne articles that misleadingly state that you can’t have a luks layer on zfs used in an lxd pool, because the pool will disappear after a reboot. Such as this github posting here. The posting is unfortunate because I think the question and answer were not aligned and so the suggestion that comes from the posting is that this can’t be done and the developers are not going to do anything about it. I think they each missed each others points.

Fact is, creating a zpool out of a luks drive is quite easy – be it a spinning harddrive, an SSD or an NVMe. I will walk though an example of creating a luks drive, creating a zfs zpool on top of that, and having the drive correctly and automatically decrypt and get imported into zfs at boot. The resultant drive has data FULLY ENCRYPTED at rest (i.e. in a pre-booted or powered off state). If someone takes your drive, the data on it are inaccessible.

But first….

WARNING WARNING – THE INSTRUCTIONS BELOW WILL WIPE A DRIVE SO GREAT CARE IS NEEDED. WE CANNOT HELP YOU IF YOU LOSE ACCESS TO YOUR DATA.  DO NOT TRY THIS ON A PRODUCTION SERVER.  EXPERIMENT ON DRIVES THAT ARE EITHER BARE OR CONTAIN DATA YOU DO NOT VALUE ANYMORE. SEEK PROFESSIONAL HELP IF THIS IS UNCLEAR, PLEASE!

Now, with that real warning out of the way, let’s get going. This tutorial works on linux debian/ubuntu – some tweaking may be needed for RH and other flavors of linux.

I will assume the drive you want to use can be found in /dev as /dev/sdx (I deliberately chose sdx as it’s less likely you can make a mistake if you cut and paste my commands without editing them first!). Be ABSOLUTELY CERTAIN you have identified the right designation for your drive – a mistake here will be … very unfortunate.

We need to first create our luks encryption layer on the bare drive.

Last warning – THE INSTRUCTIONS BELOW WILL ABSOLUTELY WIPE YOUR DRIVE:

sudo cryptsetup luksFormat /dev/sdx

The above command will ask for your sudo password first then it will ask for the encryption password for the disk. Make it long and with rich character depth (upper/lower case, numbers, symbols). Note that the command luksFormat contains an upper case letter. It’s common in all the commands – so be precise in your command entry.

Now immediately open the new encryted disk, and give it a name (I am using sdx_crypt):

sudo cryptsetup luksOpen /dev/sdx sdx_crypt

You now have access the this disk in /dev/mapper (where luks drives are located). So we can create our zpool:

sudo zpool create -f -o ashift=12 -O normalization=formD -O atime=off -m none -O compression=lz4 zpool  /dev/mapper/sdx_crypt

You can of course change our zpool parameters, obviously including the name, to your liking. But this is now a working luks encrypted zpool. You can use this in e.g. lxd to create a fully at-rest encrypted data drive which is protected in the case of e.g. theft of hardware.

But we are not quite done yet. Unless you enjoy typing passwords into your machine at every boot for every encrypted drive then we need one more additonal but technically ‘optional’ step – to automatically unlock and zfs-import this drive at boot (optional because you can enter this manually at every boot if you are really paranoid).

We do this by creating a file (similar to your password), but we store it in a /root folder, making it accessible only to root users. We use this file content to act as a password for decrypting the luks drive:

sudo dd if=/dev/urandom of=/root/.sdx_keyfile bs=1024 count=4
sudo chmod 0400 /root/.sdx_keyfile

The above two commands create a random binary file and store it in the folder /root. This file is not accessible to anyone without root privileges. We now firstly apply this key file to our encrypted disk:

sudo cryptsetup luksAddKey /dev/sdx /root/.sdx_keyfile

(You will be asked to enter a valid encryption key – it uses this to add the binary file to the luks disk header. Use the strong password you created when you formatted the drive earlier).

So now, your drive is luks encrypted with your password AND with this file. Either can decrypt the drive.

Now all we need to do is add another entry to our /etc/crypttab file, which is what linux uses at boot to decrypt and mount files. So let’s get a proper identity for our drive – somthing that will not change even if you move the disk to a different computer or plug it into a different sata port etc.:

sudo blkid

This command will bring up a list of your atatched drives and their block id’s. E.g, here’s an abridged version of mine:

What you need to look for is the entry that matches your luks drive, it will look something like this – note that there are two entries of interest, but we only need ONE:

/dev/sdx: UUID=”d75a893d-78b9-4ce0-9410-1340560e83d7″ TYPE=”crypto_LUKS”

/dev/mapper/sdx_crypt: LABEL=”zpool” UUID=”6505114850985315642″ TYPE=”zfs_member”

We want the /dev/sdx line (intentionally bolded, above in the example output). Do NOT use the /dev/mapper/sdx_crypt UUID. Carefully copy the UUID string (‘d75a893d-78b9-4ce0-9410-1340560e83d7’, in the above example). Now, open the system crypttab file as root and add an entry like below, but using your exact and full UUID from your /dev/sdx blkid command output:

sudo nano /etc/crypttab

Add the following at the bottom of the file:

#Our new luks encrypted zpool drive credentials
#Note this gets automatically unlocked during the boot cycle
#And then it gets automatically imported into zfs and is immediately #available as a zfs zpool after the system bootup is complete.
#Add the following as one continuous line then save, quit & reboot:

sdx_crypt UUID=d75a893d-78b9-4ce0-9410-1340560e83d7 /root/.sdx_keyfile luks,discard

Now reboot. Assuming your boot partition is encrypted, you will have to unlock that as normal, but then the magic happens: linux will read the crypttab file, find the disk and decrypt it using the /root/.sdx_keyfile, then pass the decrypted drive (called sdx_crypt) to zfs who will be able to import and access the zpool as normal. no delays, no errors – it just WORKS!

If you want to be 100% sure you really have an encrypted drive then, ether unmount and lock the drive locally (in which case your zpool will disappear). Or, for a more extreme test, power off your system, take the drive out and examine it on another compter – you will see the drive is a luks drive. You cannot read any data on it unless you decrypt it, and you need that /root/.sdx_keyfile or the password. At rest, powered off, your data is secure. Put the disk back into your computer (any sata port – we use credentials that identify this specific drive) and boot up – voila, your zpool will reappear.

Note that this method is very secure. It will be impossie to access this disk without unless you either have the very strong password you used to encrypt the drive or the /root/.keyfile. The latter can only be read by root-level user.

This is how we roll luks. Literally ALL of our servers, desktops and drives are setup this way. It does require the manual unlocking of the boot drive after every bare metal machine reboot, but we can do that even remotely. We think that the peace of mind for protecting our data are worth this inconvenience. (I can show how I decrypt the root partition over ssh in another article – let me know if that interests you). Good luck with your luks’ing.

Andrew